Creating fonts from SVGs – with automation! 🤖

Lately I needed the ability to create a font from an existing set of SVG files that I created in Sketch. I’m not a professional font creator, but I’ve figured out an automated workflow works that works best for me.
My workflow is as follows:
- Export the SVGs from Sketch
- Convert the SVG’s strokes to paths (Using Inkscape)
- Import SVGs into FontForge
- Export as a TrueType Font (TTF)
1. Exporting the SVGs from Sketch

How one actually designs the font is anyone’s preference, but I’m quite comfortable with Sketch’s tools. Other people might be more comfortable with Inkscape, or some other vector graphics tool. Sketch has a neat concept called “Artboards” and “Slices” that make it easy to export selections in a single file, rather than having multiple SVG files all over the place on disk. For instance, each glyph in my sketch file is a “Slice”.
Sketch has a nice command line utility called SketchTool that can automate exports like so:
# Locate the SketchTool file
sketch_app_dir=`mdfind kMDItemCFBundleIdentifier == 'com.bohemiancoding.sketch3' | head -n 1`
sketch_tool=$sketch_app_dir/Contents/Resources/sketchtool/bin/sketchtool

# Export the slices in the sketch file as SVG to the folder "svg"
$sketch_tool export slices MyFont.sketch --formats=svg --output=svg/
2. Convering the SVG’s strokes to paths

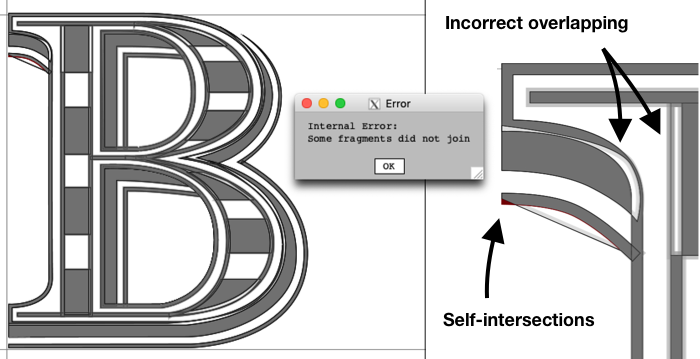
This step depends on whether your font has strokes/lines instead of paths/polygons. In my case, a lot of the elements in the font are actually line segments. This causes problems later in the process when importing the SVG files into FontForge. See the example below.
I could have manually converted the strokes to paths in Sketch, but I prefer working with outlines for some portions of the font, so I wanted to find an automated way to convert these without losing the ability to change the outline later.
Thankfully, Inkscape has a command line interface that allows me to do this automatically. So I’ve created a shell script called svg-stroke-to-path that can take in a set of SVG files, and convert all strokes to paths.
The script is run like this:
svg-stroke-to-path SameStrokeColor 'stroke="#000"' svg/*.svg
Annoyingly Inkscape does not have a way to select only shapes that have strokes before running the “Stroke To Path” macro. Instead one has to specify a particular stroke colour to select. For my usage that is not a huge problem, since all my strokes will be black (i.e. stroke=#000).
After running my script, all SVGs will now consist only of paths.
3. Importing SVGs into a font editor

I initially tried a variety of font editors for Mac OS, including BirdFont, FontForge, Glyphr Studio, and Glyphs.
I tried BirdFont and Glyphr Studio first since they looked appealing for a novice like myself. However, when I tried to export the font, I got weird glitches. It’s not exactly a “What you see if what you get” experience. Below is an example of the output for BirdFont and Glyphr respectively:

I also tried Glyphs, but I couldn’t figure out how to actually import an SVG. Nor did I want to pay €250 after 30 days for a hobby project… 😬
I found that FontForge was the most robust of the lot, especially for this particular font that I’m creating. Also, FontForge has a command line interface, which allows me to automate this workflow!
Creating a FontForge file
Now to actually create the font file! The first thing after creating a file in FontForge is to modify the font info data.
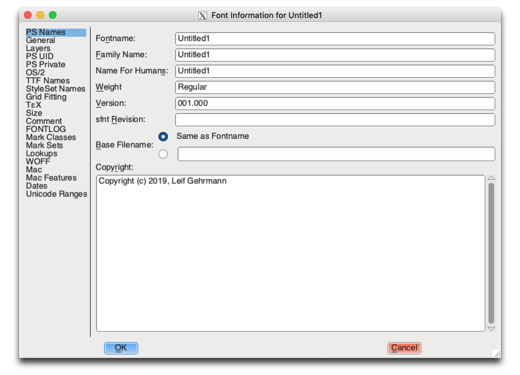
Confusingly there are 3 different names a font can have. The FontForge documentation wasn’t that helpful for me, but from what I’ve learned:
- Fontname is not displayed, but is used internally by PostScript.
- Family Name is displayed in the font picker.
- Name For Humans is not displayed anywhere.
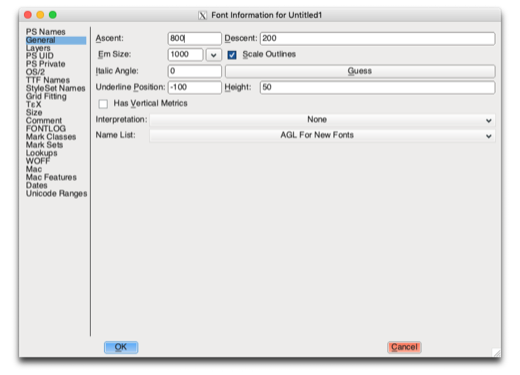
Next, in the “General” tab, you can specify the dimensions of the font. By default, the em size of the font is 1000 units, with 80% of the height dedicated to the ascent, and 20% dedicated to the descent. This will affect how the SVGs are imported! In my case, I did not need to change the settings as my SVGs were 120px in height, and the glyph was only 100px tall, which meant the baseline was exactly at the 100px line. But if one has a descender that’s greater than 20% of the height of the glyph, one will have to modify these settings. This is illustrated in the image below.

Finally, in the “TTF Names” tab, if you’d like to be a good citizen of Earth and make your font publicly available, be sure to add the SIL Open Font License!

Importing the SVG glyphs
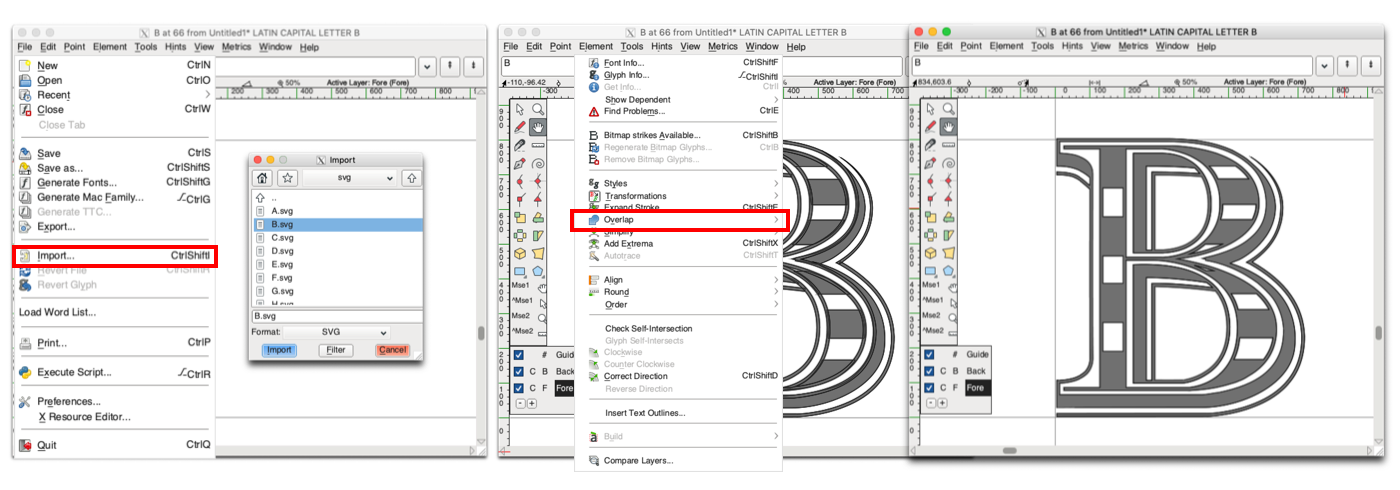
To import an SVG file in FontForge, for every glyph, one has to:
- Open the glyph
- Select File > Import > Select the file
- Select All (CTRL + A)
- Select Element > Overlap > Remove Overlap
That’s a lot of work if one needs to do that for over 26 glyphs… 😫
Since FontForge has a command line interface, I created a another shell script called fontforge-svg-importer to import the SVG files into FontForge automatically and repeat the same commands as above.
fontforge-svg-importer MyFont-base.sfd \
  MyFont-generated.sfd \
  svg/*.svg
For each SVG file, the script reads the letter from the filename (e.g. A.svg will be the glyph “A”), import the SVG to the corresponding glyph, then save the result into a new FontForge file called MyFont-generated.sfd.
4. Exporting the font
In FontForge, select File > Export Font. Or, using the automated way, run the following command:
fontforge -lang=py -c\
  'import fontforge;\
  font=fontforge.open(argv[1]);\
  font.generate(argv[2])'\
  MyFont-generated.sfd MyFont.ttf
That command should output a file called MyFont.ttf.
To install the font, just double click on the TTF file and install. Or, if you are on a mac, just do this:
cp MyFont.ttf ~/Library/Fonts
And voilà, the font can now be used.

And that’s it! 🎉
Hopefully this guide was helpful enough for someone who wanted to take a shot at creating their own fonts and who happens to prefer Sketch as a vector shape editor (or any other SVG editor for that matter).
For an example of my automated workflow see my map-fonts repository. To generate the font file, all one has to do is run the command make (assuming all dependencies are installed first of course).